
Style Hack: How To Make Ripped Jeans at Home?
There’s something about ripped jeans that make them so cool and on-trend. They blend fashion and utility, creating the perfect casual and funky-chic look. But buying ready-made ripped jeans can be expensive, so why not make your own? In this post, I’ll give you my best tips on making ripped jeans!
Distressing Techniques for Ripped Jeans
Let’s explore some simple methods for achieving a distressed denim look! There are a variety of techniques you can use to achieve the perfect ripped jeans look. Read on to learn more about distressed denim techniques!
1. Cutting and fraying
One technique for distressing jeans is to make straight cuts or slits in specific areas to create intentional tears and frayed edges. I use scissors to make precise cuts or pull the threads with tweezers to create a frayed effect.
Also Read: How To Sew Ripped Jeans?
2. Ripping with scissors and tweezers
I also use scissors and tweezers to create more dramatic ripped effects on my jeans. I make small cuts with the scissors and then use the tweezers to pull out the vertical threads, resulting in a more prominent and rugged rip.
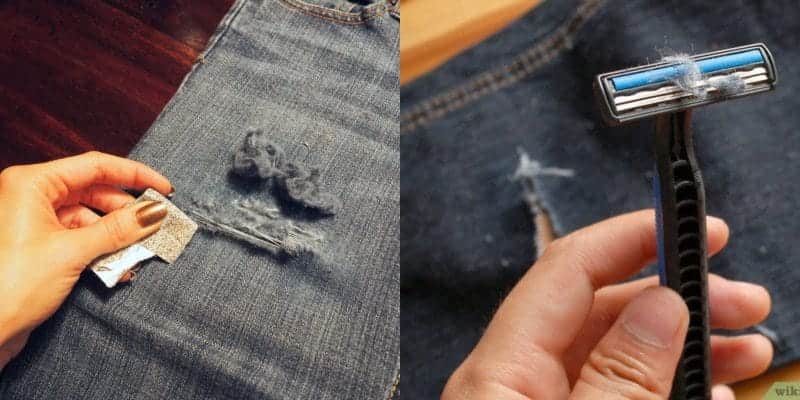
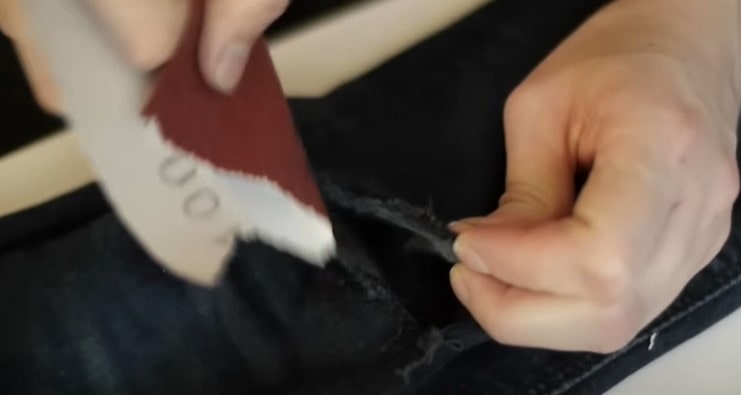
3. Using sandpaper for a worn-out look
I gently rub sandpaper against the jeans’ surface to achieve a worn-out and distressed look. This creates areas of faded color and a rough texture, giving the jeans a vintage or well-worn appearance.
4. Adding whiskering and fading effects
I focus on the areas around the thighs, knees, and back pockets for whiskering and fading effects. I use sandpaper, scissors, or even a pumice stone to create subtle abrasions and lighter patches of color in these areas, imitating natural wear patterns.
5. Experimenting with bleach and dye
I experiment with bleach or fabric dye. I apply bleach strategically to lighten certain areas or use fabric dye to create a tie-dye effect, adding a splash of color to my distressed jeans.
How To Make Ripped Jeans?
Ripped jeans have been a popular fashion trend for quite some time now. They effortlessly add a touch of edginess and style to any outfit. If you want to create your fashionable ripped jeans at home, you’ve come to the right place! This step-by-step guide will walk you through making ripped jeans using easy DIY techniques. So, let’s get started and have some fun experimenting with distressed denim!
Step 1: Gather the Materials
To begin, gather all the necessary materials:
- A pair of jeans (preferably old or thrift),
- Chalk or fabric marker,
- Sharp scissors,
- Tweezers,
- Sandpaper or a pumice stone,
- A cheese grater or razor.
Step 2: Choose the Placement of Rips
Put on the jeans and use the chalk or fabric marker to mark the areas where you want the rips. You can choose the knees, thighs, or anywhere else you desire. This step will help you visualize the final result and plan your distressing process accordingly.
Step 3: Cut Horizontal Slits
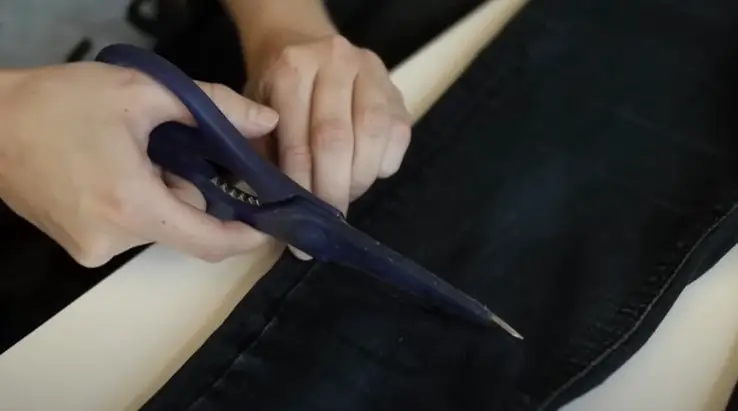
Take the scissors and carefully cut horizontal slits at the marked areas. Start with small slits, as you can always make them larger later. Remember to leave a small gap between each slit to prevent the jeans from tearing too much.
Step 4: Create Vertical Frays
Cut vertical lines from the bottom of the horizontal slits using the scissors. Make these cuts about half an inch apart. These vertical cuts will create frayed edges for a more distressed look.
Step 5: Pull Out Horizontal Threads
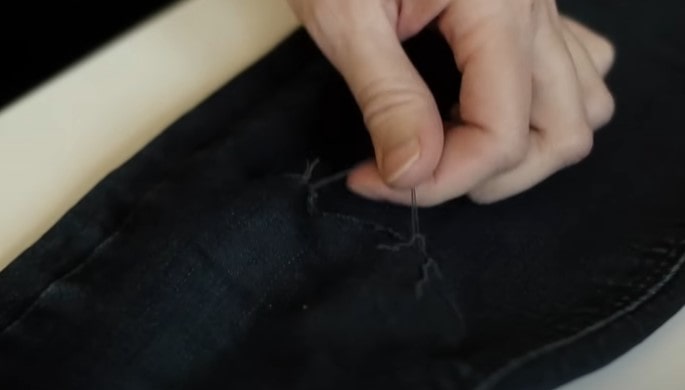
Take the tweezers and gently pull out the horizontal threads from the slits you made. This will expose the vertical threads and enhance the distressed effect. Be patient and take your time to achieve the desired level of fraying.
Step 6: Add Additional Distressing (Optional)
If you want to take your ripped jeans to the next level, you can add some additional distressing techniques. For example, you can use sandpaper or a pumice stone to create small abrasions on the fabric. You can also use a cheese grater or razor to scrape the denim, adding a more worn-in look.
Step 7: Try On and Make Adjustments
Put on the jeans to see how they fit and look. If some areas need more ripping or fraying, make the necessary adjustments. You can always go back and cut larger slits, create more frays, or distress the denim further to achieve the desired style.
Step 8: Wash and Dry
Once you’re satisfied with the distressing, it’s time to wash your ripped jeans. This step will help soften the fabric and give it a more natural, worn-in appearance. Be sure to follow the washing instructions for your jeans and then let them air dry or use a dryer, depending on the fabric type.
Step 9: Style and Rock Your Ripped Jeans
Now that your homemade ripped jeans are ready, it’s time to show them off! Experiment with different tops, shoes, and accessories to create trendy outfits. Ripped jeans can be worn, depending on the occasion, so let your creativity shine.
Step 10: Maintain and Repair
As you wear your ripped jeans, they may experience additional wear and tear. To keep them looking great, regularly check for loose threads or holes and repair them as needed. Stitch up any tears or reinforce frayed areas with fabric glue or patches.
Frequently Asked Questions (FAQs)
Can any jeans be ripped?
No, you cannot rip all your jeans. You’ll need to start with jeans made of a thinner fabric, such as denim or cotton, as these are the most likely to tear. Then, you must decide where to create the “rip” effect on the jeans. Once you have determined the area you want to target, you can use scissors or a razor to create the desired look.
How do I choose the right jeans for distress?
Choosing the right jeans for distress is all about finding the right fit and style that best suits you. If you’re looking for ripped jeans, try to find a pair with a relaxed fit and a good amount of stretch. It’s important to note where you want to distress your jeans, as this will help you choose the right size. It’s also important to pay attention to the fabric – opt for thick denim to hold up to the distressing process.
Can I distress jeans that are already faded?
Yes, you can distress jeans that are already faded! I recently tried it myself and found it to be relatively easy. All you need is a pair of scissors and some creativity. I recommend starting with simple cuts and tears and progressing to more intricate designs. You can create an awesome pair of ripped jeans with a few careful snips and tugs!
What if I need to correct a mistake during the distressing process?
If I must fix a mistake during the distressing process, I suggest removing the thread and starting over. It’s important to keep track of your progress and keep your jeans intact. If I had to do it repeatedly, I would take a few extra minutes to ensure I’m doing the job right.
Conclusion
Now you know how to make ripped jeans in the comfort of your own home. With just a few simple steps and materials, you can create cool, stylish ripped jeans that you can wear with anything. Whether you want to wear them with a plain t-shirt and sneakers or as a part of a dressed-up look, it’s a great way to add a touch of personality to any outfit. So go ahead and try it out for yourself and show off your new look to your friends and family!